2018年6月17日日曜日

make a wish (Scrap Our Stash DT Work)


Hello! The new layout I'm happy to share today is made with the Blend-A-Sketch Challenge from Scrap Our Stash. I mainly used the right sketch, and took the photo part from the left. Here are the sketches, and don't forget to add Star embellishments and/or Star patterned paper!
 
こんにちは!今日のレイアウトはScrap Our Stash のスケッチチャレンジで作りました。二つのスケッチを組み合わせて一つのレイアウトを作ります。私は、主に右のスケッチを使い、写真部分は左から取りました。それから、星のエンベリと(または)星のペーパーを使うのも忘れないでね☆


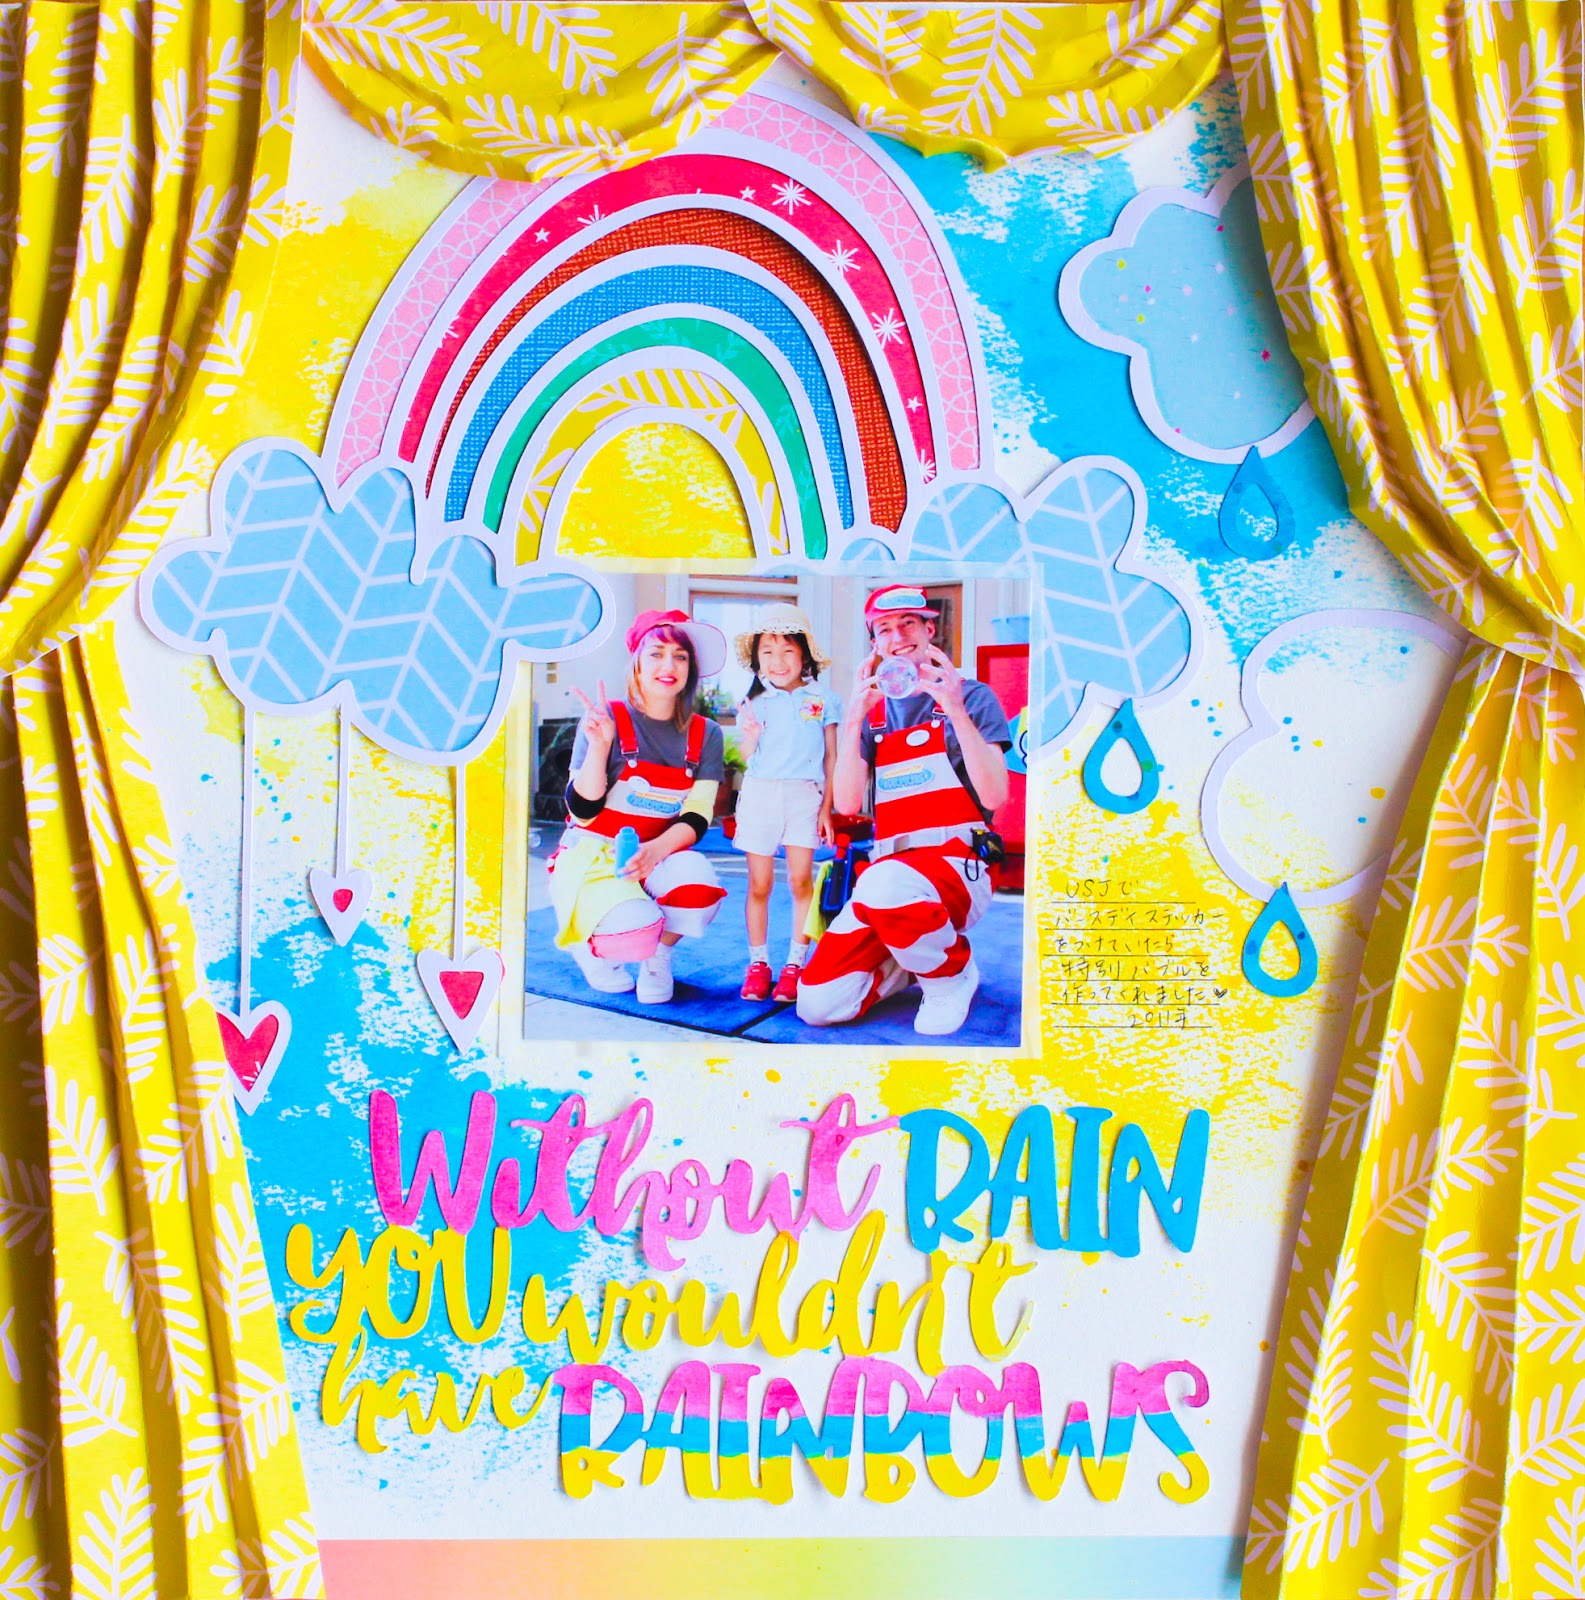
I started with using a cut file. I backed some of the stars and circles with paper, cut one third of the cutfile and layered it with blue cardstock. Then I tore the cardstock a little larger than the cut file and layered it with green patterned paper. After I adhered all the papers, I splattered white red and blue acrylic paint. I layered the pictures with tissue paper and cardstock, and adhered them. I used embellishments such as diecuts, sequins, flairs、 washi tape and a ribbon. I stitched through the title and journaling to add some interest. Here are the close-ups;

まず、カットファイルを使うことにしました。いくつかの星や丸の後ろにペーパーを重ねて貼り、1/3をカットして、ブルーのペーパーに貼りつけました。ブルーのペーパーもカットファイルより少し大きめにちぎってパターンペーパーに貼りつけ、白、赤、青のアクリル絵の具を飛ばしました。写真に包装紙とペーパーを重ねて貼り、ダイカット、スパンコール、木のボタン、マステとリボンで飾りつけました。タイトルとジャーナルにミシンをかけて完成!


I can't wait to see how everyone blended the sketches! Thank you so much for stopping by, and have a nice Sunday♪
 
皆さんがどのようにスケッチを組み合わせたのか、楽しみにしています!訪問してくださり、ありがとうございました。良い日曜日を!

Instagram URL http://instagram.com/natsukoslittlecraftroom

Natsuko xxx

2018年6月15日金曜日

Without RAIN you wouldn't have RAINBOWS (CSI CASE FIE #256 DT Work)


Hi friends!! I'm so excited to share my layout I made for CSI! Here is the case file. Please visit the Challenge site for details.
 
こんにちは!今日は CSI のDTワークを紹介します♪ 詳しいチャレンジの参加方法は、チャレンジサイトを見てね!質問はいつでもどうぞ。
 
 
I was inspired by the curtain and the drops of water. I started with creating the curtains. I scored pattened paper and folded them, crumpled them a little to soften the paper, and twisted one edge. Love how dimentional it became. Before I adhered them, I did some mixed media on the background. I spread some acrylic paint and splattered some more. I didn't use any gesso so the colors stayed quite bold. I cut out the clouds and a rainbow with my cameo, and backed them with different colors of paper. I also cut out the title and raindrops and painted them. After I placed all the cut out pieces, I adhered them with the photo and them adhered the curtains. It was a little difficult to stick the curtains, but I used several types of adhesives just in case. I didn't add any other embellishments since there was so much going on already. I wrote my journal and finished the layout. Here are some details;

カーテンと水のしずくからインスピレーションをもらいました。まず、パターンペーパーに折り目をつけ、柔らかさを出すために少しくしゃっとさせながら端をねじりました。立体感がいい感じに!貼りつける前に、背景に着色をしました。アクリル絵の具をのばし、さらに筆で飛ばしました。今回はジェッソを塗らなかったので、色もはっきりとでています。雲と虹をダイカットし、色んな色のペーパーを後ろに貼りつけました。タイトルと雨のしずくも同じくダイカットしてから着色。すべてのパーツを並べ、写真と一緒に貼りつけてからカーテンも貼りつけました。立体的なので、貼るのに少しコツがいりますが、念のためテープのりや両面テープ、液体糊など色んな糊を使っています。これでもう、お腹いっぱいだったので、他のエンベリはなし!ジャーナルを書いて完成。


I really love how it turned out! Hope you like it too! Thank you so much for stopping by, and have a wonderful craty day!
 
面白いレイアウトができました!自分では結構気に入っていますが、どうでしょうか??訪問して下さり、ありがとうございました。皆さんも楽しんで作ってみて下さいね♪

Instagram URL http://instagram.com/natsukoslittlecraftroom

Natsuko xxx


DREAM BIG (Let's Get Sketchy DT Work)

 
Hi there! Today's layout is made with the new sketch from Let's Get Sketchy.  I rotated it. Here is the sketch!
 
こんにちは!今日のDTワークは、Let's Get Sketchy です。私はスケッチを90度回転させました。こちらがスケッチ。


I wanted to soften the background, so I spread some white acrylic paint on each side of the layout, where my photo and clusters were supposed to be placed. Then I punched out some circles, distressed the edges and placed them under the photo. I matted the photo with tissue paper and foam to add dimention. I fussy cut some flowers and popped some of them around the picture. I also added chipboard, sequins and stickers. I wanted to add another color, so I tore the upper left and lower right paper and backed it with light blue paper. Then I added a bit of light blue acrylic paint on top of the white paint, and scattered enamel dots with the same color. I wanted to make a track of the butterflies, so I punched holes and hand stitched with yellow thread. I also outlined the circles and some of the chipboard to make them stand out a little more. Here are the close-ups;

背景の色を和らげたかったので、写真と飾りを配置する場所に白のアクリル絵の具を塗りました。次に丸をたくさんパンチし、周りをディストレスしてランダムに写真の下に貼りつけました。写真には包装紙とフォームを重ねてポップアップしています。お花も、ペーパーからカットアウトして写真の周りにポップアップし、チップボード、スパンコール、ステッカーなどで飾りつけました。もう一色、色を足したかったので、ペーパーの左上と右下をちぎり、水色のペーパーを重ねました。その色と合わせるために、水色のアクリル絵の具を白にところどころ重ね、同色のエナメルドッツを散りばめました。蝶が飛んでいるように見せたかったので、穴をあけて黄色の糸でステッチ。最後に丸とチップボードの周りをペンで囲み、目立たせました。


To be honest, I didn't think it will be like this when I first started, but this is something I enjoy when I make layouts. I really enjoyed the process, and I love how it turned out! Thank you so much for stopping by, and have a nice weekend!

正直に言うと、作り始めはこういう仕上がりになるとは思っていませんでした。でもこれもレイアウトを作る楽しみの一つ。今回も楽しんで作れました♪ 出来上がりにも満足!訪問して下さり、ありがとうございました。良い週末をお過ごしください♡

Instagram URL http://instagram.com/natsukoslittlecraftroom

Natsuko xxx


2018年6月6日水曜日

CELEBRATE TODAY

 
Hi! I made a layout without any challenges, but inspired by many talented scrappers! I puched out little frames and squares with different paper, layered them. I also punched out butterflies in two sizes and layered them.  I sprayed and splattered some yellow ink on white cardstock, and placed the squares and butterflies in a spiral pattern. Then I did some stitching over the middle of them with red thread. I embellished each square with stickers, chipboard, flairs and a ribbon. I added a title and the journal and finished my layout! So fun!! Here are some details;
 
こんにちは!今日はDTワークではなく、色んなスクラッパーさんからインスピレーションをもらって作ったレイアウトです♪ フレーム型のパンチ(ベースとフレーム)とバタフライパンチ(2サイズ)を使って色んなペーパーをパンチし、それぞれパンチした二つを重ねて貼りました。白バジルに黄色のインクで着色し、すべてのパーツを渦巻きのように配置します。その中心を赤い糸でミシンをかけました。フレームにそれぞれステッカーやチップボード、ボタンやリボンで飾りつけ。タイトルとジャーナルを書いて完成!


I really enjoyed making this one, I love all the different colors and patterns. Thank you so much for visiting and have a nice day!
 
色んな色やパターンペーパーを使って作るレイアウト、とても楽しめました♪ 訪問して下さり、ありがとうございました。良い一日を♡
 
Instagram URL http://instagram.com/natsukoslittlecraftroom

Natsuko xxx


2018年6月3日日曜日

FUN TODAY (Scrap Our Stash DT Work)


Hi! I'm happy to share my new layout  for the new Scrap Our Stash Golden Globe Stash Challenge. Create a layout inspired by this movie and you MUST include a stash item for each letter in the word - FATHER. I chose F- Fussy Cutting/Flair,  A-Arrows,  T-Tags, H-Hearts, E-Enamel Dots, R-Red.
 
こんにちは!Scrap Our Stash の新しいチャレンジで作ったレイアウトです♪ この映画から受けるインスピレーションと、FATHERのそれぞれの文字から始まる材料を使ってレイアウトを作って下さい♪ 私はFussy Cutting (カットアウトすること)、ボタン、矢印、タグ、ハート、エナメルドッツ、赤を使いました。
 
 
I used a cutfile that I downloaded from Hip Kit Club a while ago, and backed most of the arrows with several patterns and colors. Before I adhered them, I used several shimmerz paints and colored the background. I randomly placed all the arrows, and placed the photo, decorated with hearts, words and flowers that I fussy cut, dimentional flower stickers, tags, a bow and a flair. I also scattered some enamel dots throughout the layout. Here are some close-ups;

昔ダウンロードしたカットファイルを使いました。ほとんどの矢印の裏に色んな色やパターンのペーパーを貼りました。それらを貼りつける前に、背景をインクでカラフルに着色。矢印を色んな向きにして貼り、写真を貼りつけてからカトアウトしたハートや文字、お花、立体的なお花のステッカー、タグ、りぼん、ボタンを飾りました。最後にエナメルドッツを散りばめて完成!


This was so fun to make! I hope you like it! Thank you so much for stopping by, and I hope you'll play along♪
 
カラフルでとても楽しく作れました。皆さんにも気に入ってもらえますように。立ち寄って下さってありがとうございました!次は皆さんの番ですよー。楽しみにしています♡


Instagram URL http://instagram.com/natsukoslittlecraftroom

Natsuko xxx

2018年6月1日金曜日

are you HANGRY? (CSI CASE FIE #255 DT Work)

 
Hi scrappers! I'm so excited to share my new layout for CSI. Please visit the challenge site for details, and you will also see all the awesome layouts created by the design team.
 
みなさんこんにちは!今日のレイアウトは、 CSI の新しいチャレンジで作ったDTワークです。詳細や、デザインチームのレイアウトは、チャレンジサイトを覗いて見てね!


I used all the colors from the color pallet, and from the evidece, I used solid white background, dots, rhinestones, ribbons, circles, donut, decorative border and texture paste. I used several paints for the background. First I spread clear gesso, and then watercolor stripes, modeling paste and textured paste to create patterns and dots. I love all the dimention that the paints create!

カラーパレットの色と、チャレンジの中の白い背景、ドット、ラインストーン、リボン、円、ドーナツ、飾りのあるボーダー、テクスチャペーストを使いました。背景には数種類のペイントを使っています。最初にクリアジェッソを広げ、その後水彩絵の具でストライプ、最後にモデぺとテクスチャぺーストで模様やドットをつけました。色々なペイントを使うと立体感が出ていい感じです!


I layered donut diecuts and buttons, flairs and punched out circles under the pictures. I popped up an ice candy bar sticker and tied a ribbon.
 
写真の下に、ドーナツのダイカットやボタン、パンチした円などを写真の下に配置。アイスのステッカーをポップアップ、リボンを結びました。


The pictures were taken when my daughter was in baking class. She could barely wait to eat because it smelled so good in the oven and was so hungry!! I popped up the word HANGRY..lol. 
 
写真は、娘がパン教室に行った時のものです。お腹空いていたのと、オーブンから出て来るいい匂いでもう待てない娘(笑) タイトルのHANGRY は、腹が立つ(ANGRY)ほどお腹が空いている(HUNGRY)という意味です(スペル間違いではありませんよー笑)。この文字は、ステッカーから一文字ずつ切り出してポップアップしました。
 
 
I wanted to used 4 pictures, so I put an extra photo inside, folded the paper in half, adhered a border and put a stopper with a brad to keep it closed. If you slide the stopper, it will open like a card.

写真を4枚使いたかったので、中に追加した写真を貼り、ペーパーを半分に折り、ボーダーを貼りつけてブラッズとストッパーを使って開かなように固定しました。ストッパーをずらすと、開きます。


I scattered sequins and rhinestones for some sparkles too. I love the cool color palette,  I definitely want to use these colors again!! Thank you so much for visiting and I hope you will play along with us! 
 
最後にスパンコールやラインストーンを散りばめてキラキラに。この色の組み合わせ、すごく気に入りました!また絶対使おう♪ 訪問して下さり、ありがとうございました。皆さんのご参加、お待ちしております♡
 

Instagram URL http://instagram.com/natsukoslittlecraftroom

Natsuko xxx

BEST summer together (Let's Get Sketchy DT Work)


Hi! Today I'm sharing a layout I made for Let's Get Sketchy. I made a summer layout with a picture I took 7 years ago (gee, time flies!!). Here is the sketch!
 
こんにちは!今日はLet's Get Sketchy のスケッチで作ったDTワークです。7年前の写真で作りました(もう7年!早すぎます!!)。こちらがスケッチ。
 
 
The paper I used already had several colors and I decided to emphasize the colors. I did that by creating a pattern with modeling paste and a stencil, and sprayed over the patterns with the same color as the background. Here are some close-ups of them.

背景に使ったペーパーはすでにカラフルだったのですが、それぞれのカラーをもう少し強調しようと思いました。モデぺとステンシルで模様づけをして、上から同じ色のミストをスプレーしました。


Then I machine stitched a blue net like a pocket, scattered some sequins in it and sewed the open part. I used yellow twine to create a circle, and adhered it under the photos. I layered the pictures with paper and foam, popped them up and decorated around them with dimentional flower stickers.
 
次に水色のネットをポケットのようにミシンで縫いつけ、中にスパンコールを散りばめて最後の一辺も縫いつけました。黄色の紐で円を作り、写真の下に配置。写真はペーパーとフォームを重ねてポップアップ、周りを立体的なお花のステッカーで飾りつけ。


Acetate and puffy stickers for the title.

アセテートとぷっくりステッカーをタイトルに。


I used several ribbons and did some more stitching.

リボンでボーダーを作り、ここもミシンをかけました。

 
I say this a lot, but I LOVE summer layouts! The happy colors and pictures make me so happy, and I love how this turned out. Thank you so much for stopping by, and I hope you'll enjoy making one too!
 
いつも言っておりますが…夏レイアウト大好き!色も写真もハッピーになるので本当に作ってても楽しい♪ 訪問して下さり、ありがとうございました。皆さんも楽しくレイアウトを作ってくださいね!


Instagram URL http://instagram.com/natsukoslittlecraftroom

Natsuko xxx