2020年6月16日火曜日

dream big (CSI Cold Case File #323 DT Work)


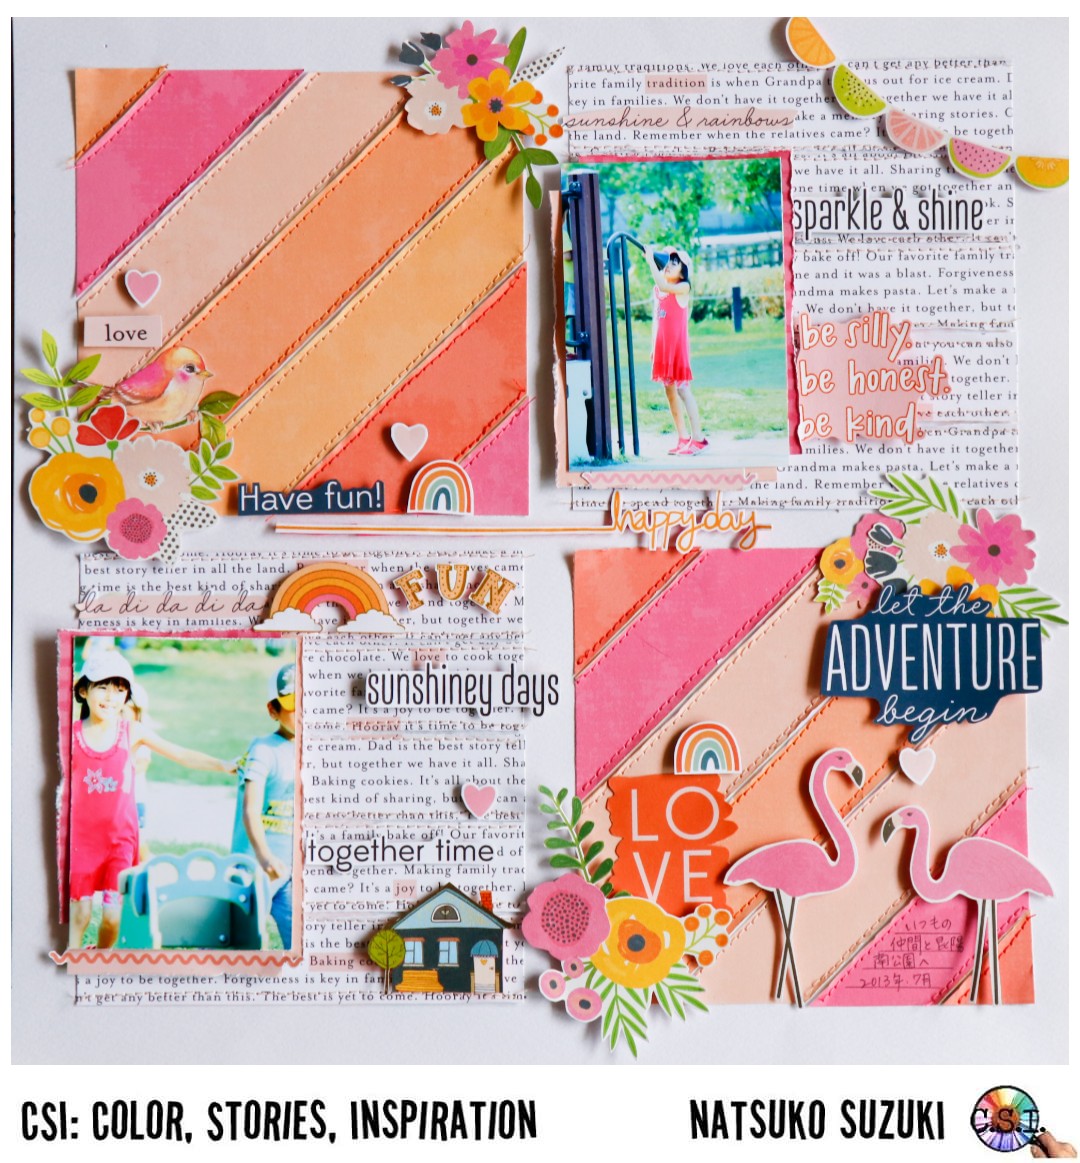
Hi again! This is my layout for the Cold Case File from CSI. This is a bonus challenge for those who want to try to resurrect some of their old stash. I decided to use some old paper designed by Maggie Holmes. 

またまたこんにちは!今日のレイアウトは、 CSI のボーナスチャレンジです。このチャレンジは、古い材料を消費してレイアウトを作ろうというものです。私は、Maggie Holmesがデザインした数年前のペーパーをメインに使うことにしました。


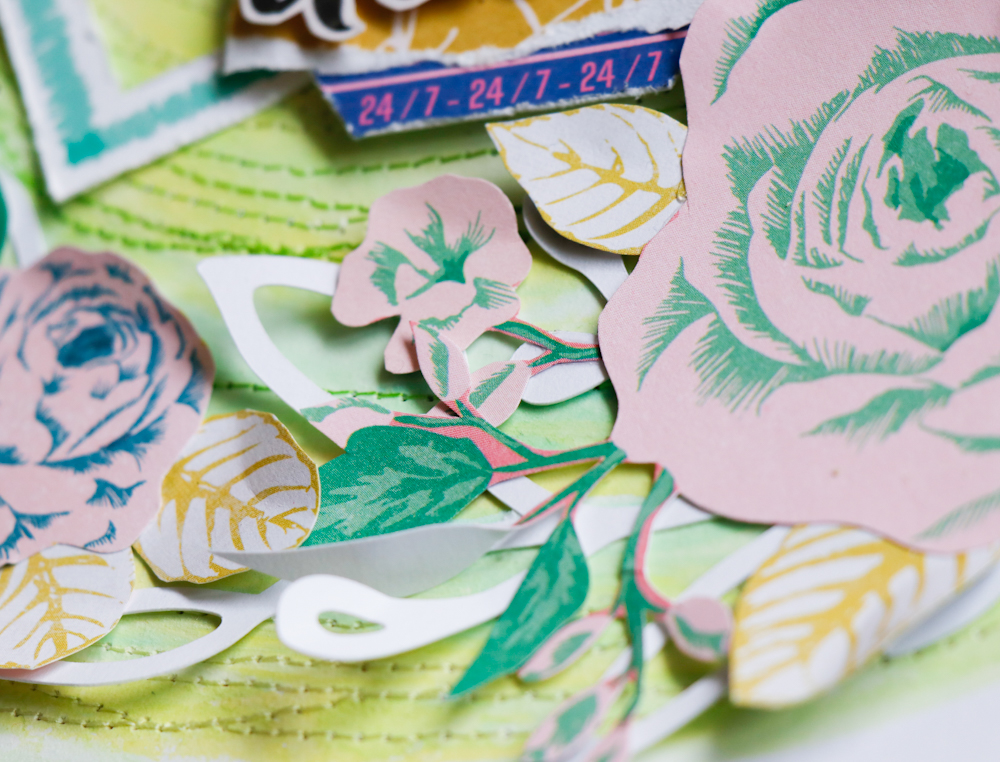
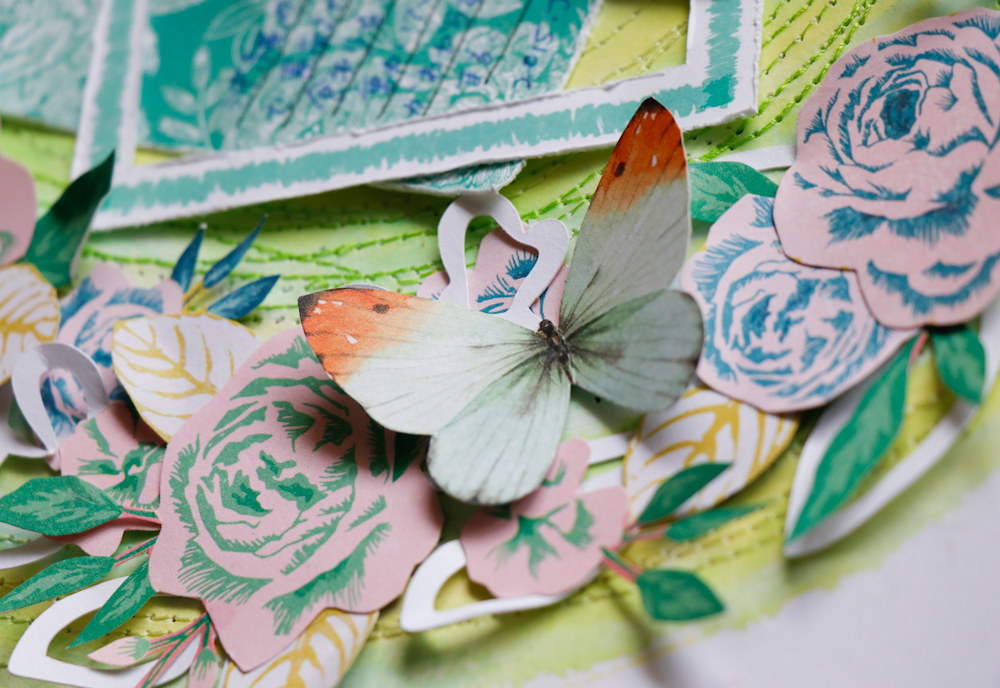
I had lovely floral paper so I decided to fussy cut the flowers and leaves. You can't go wrong with floral paper, so I always tend to hoard them!! Before I adhered anything down, I did some painting on the background. I used similar colors from the challenge, and painted circles. Then I stitched around the circle with matching thread. I layered a cut wreath cutfile and placed all the flowers, leaves and butterflies and adhered them.

花柄のペーパーが何枚か残っていたので、まずそこからお花と葉っぱをカットアウトすることに。花柄のペーパーは間違いないのでつい、買いすぎてしまいます(笑) 貼り付ける前にまず、背景をチャレンジの絵から似た色を使って円状に着色。その上を同じ色合いの糸でミシンをかけました。上からリースのカットファイルを重ね、そこにカットアウトしたお花や葉っぱ、蝶などを配置して貼り付けました。


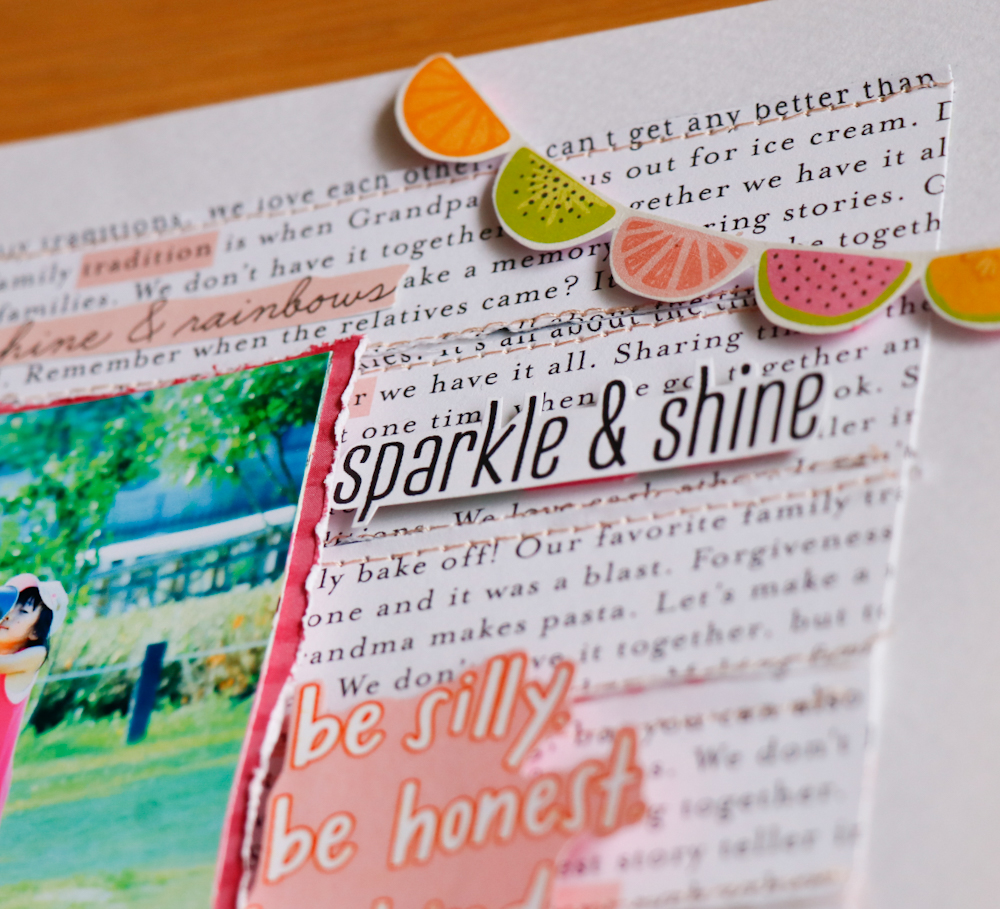
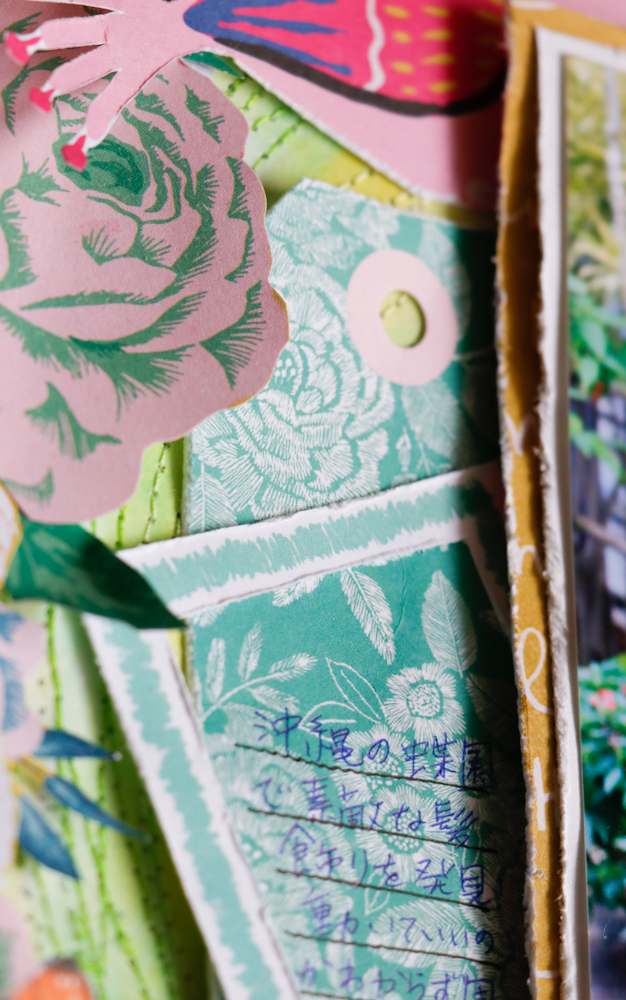
I layered some paper under my photo and distressed the edges and added foam underneath. I also added a tag and frame and wrote a journal inside.

写真のしたにペーパーを何枚か重ね、端をディストレス。タグとフレームも加えて中にジャーナルを。


I lifted the edges of the flowers and leaves and also the wings of the butterflies. By this, the layout will be so dimentional and interesting!

お花や葉っぱの端、蝶の羽を持ち上げています。こうすることでレイアウトがのっぺりせず、動きがでますよね。


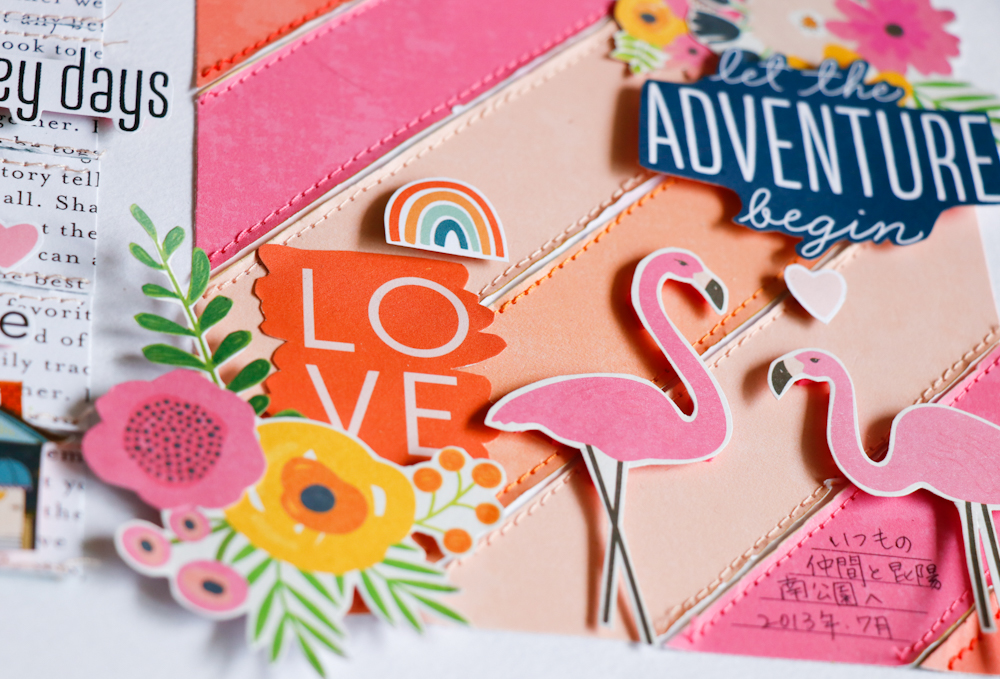
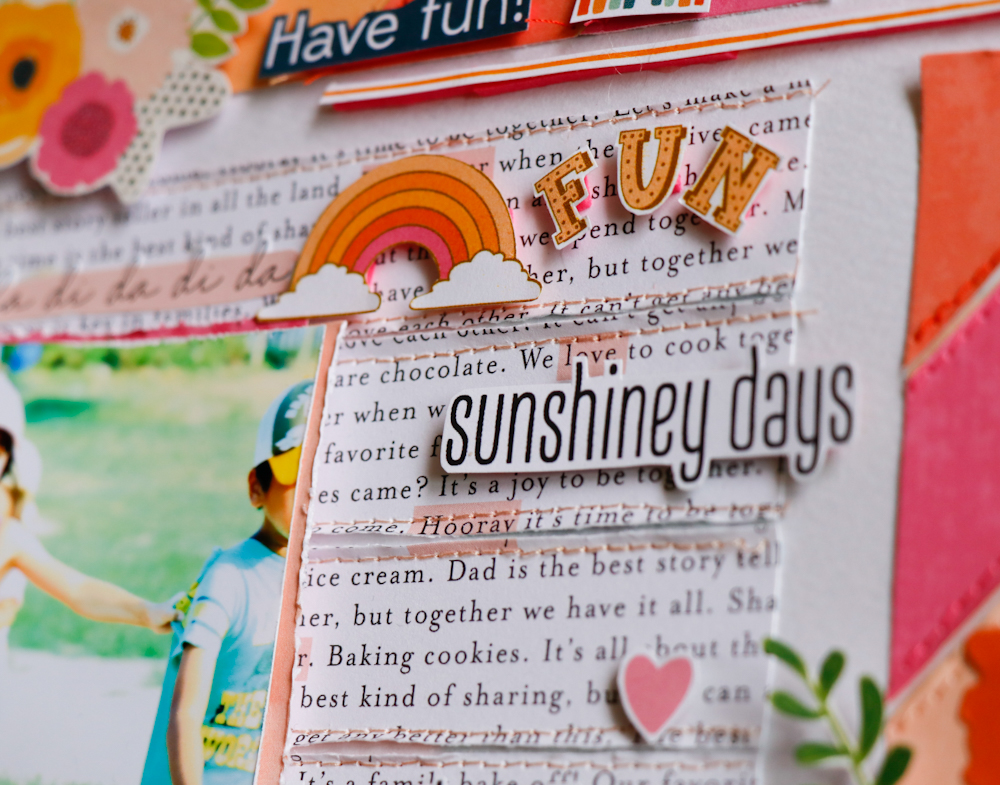
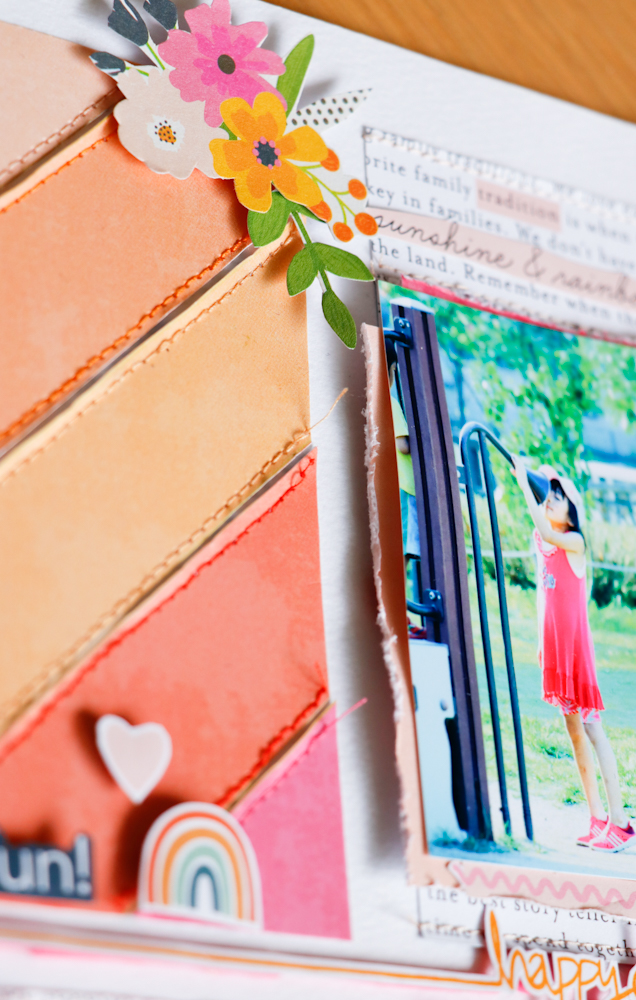
Here are some more close-ups;

クローズアップをもう少し。


I'm happy that I was able to use up some of my stash, and I hope you will join us in this challenge too! Thank you so much for visiting, and have a scrappy day!

材料を少し消費できて満足!皆さんも是非、チャレンジに参加して眠っている材料を少しでも消費してね♪ 訪問して下さり、ありがとうございました。

INSTAGRAM   http://instagram.com/natsukoslittlecraftroom

Natsuko xxx

2020年6月15日月曜日

happy day (CSI Case File #322 DT Work)


Hi Scrappers! This is my second layout for this month's CSI Case File. Here is the Challenge.

こんにちは!CSI  今月二つ目のレイアウトです。こちらがチャレンジ♪


I decided to design this in 4 quadrants. I cut 4 big squares from patterned paper and cut them in strips. I placed the strips, adhered them and stitched over them. I lifted the edges. I added layers of scrap paper under the photos, distressed the edges and popped them up with foam. I embellished with diecuts and fussy cut flowers and words and popped most of them up too. I love all the texture and dimention of this layout! Here are the close-ups;

4つのエリアに分けてレイアウトを作ることにしました。パターンペーパーを大きく4枚カットし、ボーダー状にカットしました。ボーダーを並べて貼ってからミシンをかけ、ボーダーの端を持ち上げました。写真の下にペーパーを何枚か重ね、端をディストレスしてフォームでポップアップ。エンベリにはダイカットやカットアウトしたお花や英字を使い、これらもほとんどをポップアップしました。ステッチやポップアップで立体感が増します!クローズアップです♪


I didn't want to cover up the stitching, so I just embellished the corners for this square.

ミシンをかけたところを隠したくなかったので、このエリアは端っこにだけ飾りつけ。


I had so much fun creating this layout! Thank you for stopping by, and I hope this inspired you in some way.

今回も楽しく作れました!立ち寄っていただき、ありがとうございました。皆さんの作品作りのヒントに少しでもお役に立てたら嬉しいです♡

INSTAGRAM   http://instagram.com/natsukoslittlecraftroom

Natsuko xxx

2020年6月13日土曜日

live laugh love (My Creative Scrapbook DT Work)


Hi again! This is my mini album made with the My Creative Scrapbook Limited Edition Kit. I used to make this type of album a lot several years ago. It closes with a magnet inside. I made the base with white cardstock, adhered paper on each section and embellished with what was left in the kit. I was able to adhere 6 pictures and a journal. Here are the closeups;

おはようございます! My Creative Scrapbook  のLEキットで作った最後の作品はミニアルバム!昔よく作っていたマグネットで閉じるパタパタアルバムです。ベースは白のカードストックで作り、各セクションにペーパーを貼り付けて余った材料で飾りつけ。中に写真6枚とジャーナルを入れることができました。クローズアップです♪


I used up all the papers and most of the embellishments! I still have bits and pieces left, so I will save them for another project. Really, there are so many beautiful elements in this kit, and you won't regret having it!

ペーパーすべてとほとんどのエンベリを消費しましたが、まだ細々したパーツが残っているので、また違うものを作る時のために置いておくことにしました。このキット、本当に素敵なものが盛りだくさん入っているので買って後悔しないと思います!


You can get more information about this and the other kits at My Creative Scrapbook and you can find tons of inspiration in the blog too!

Thank you for visiting, and have a scrappy day!

このキットと、その他のキットはこちらで買えますよ~。ブログもどうぞ!
訪問して下さり、ありがとうございます!


Instagram: https://www.instagram.com/natsukoslittlecraftroom

2020年6月12日金曜日

beauty (My Creative Scrapbook GDT Work)


Hi! This is my last 12 inch layout I made with the My Creative Scrapbook Limited Edition kit. You can make so many layouts with the kit!

I did some mixed media with this one too. I forgot to spread gesso first before I painted the background, so when I added water, it kind of soaked up a lot and made the paper curl up.  I had to place a weight on top of it to flatten, so I recommend you to spread gesso before painting. There were many butterflies in this paper, so I cut just the wings of them with a craft knife and lifted them up. I backed the places I cut with scrap paper. I also fussy cut flowers from paper and layered them around the photo along with prima flowers. Here are the close-ups;

おはようございます!My Creative Scrapbook のLEキットで作った最後の12インチです。一つのキットでたくさんのレイアウトが作れます♡

今回も背景に着色。最初にジェッソを塗り忘れたので、絵の具に水を足したらペーパーが水を吸い込んでボコボコに!後で平らにするために重しを乗せないとダメでした。というわけで、着色前にはジェッソを塗ることをお勧めします。蝶がたくさん描かれていたので、カッターで羽の部分だけ切り込み、持ち上げました。切った裏側にはあまりペーパーを貼っています。さらに、ペーパーからお花をカットし、プリマフラワーとともに写真の周りに飾りつけ。クローズアップです♪


I still had leftovers, so I made a mini album with them. I'll post it soon!

まだ材料が残っているので、ミニアルバムも作りました。近日中にアップしますね♪


You can get more information about this and the other kits at My Creative Scrapbook and you can find tons of inspiration in the blog too!

Thank you for visiting, and have a scrappy day!

このキットと、その他のキットはこちらで買えますよ~。ブログもどうぞ!
訪問して下さり、ありがとうございます!


Instagram: https://www.instagram.com/natsukoslittlecraftroom


Natsuko xxx