2018年11月17日土曜日

PARADISE (Scrap Our Stash DT Work)


Hello!!  Here is my take on the Blend A Sketch Challenge from Scrap Our Stash. Here are the sketches, and don't forget to add Pennants or Banners!
 
こんにちは!Scrap Our Stash の新しいチャレンジで作ったDTワークを紹介します。こちらがスケッチです。ペナントまたはバナーを加えるのもお忘れなく!
 

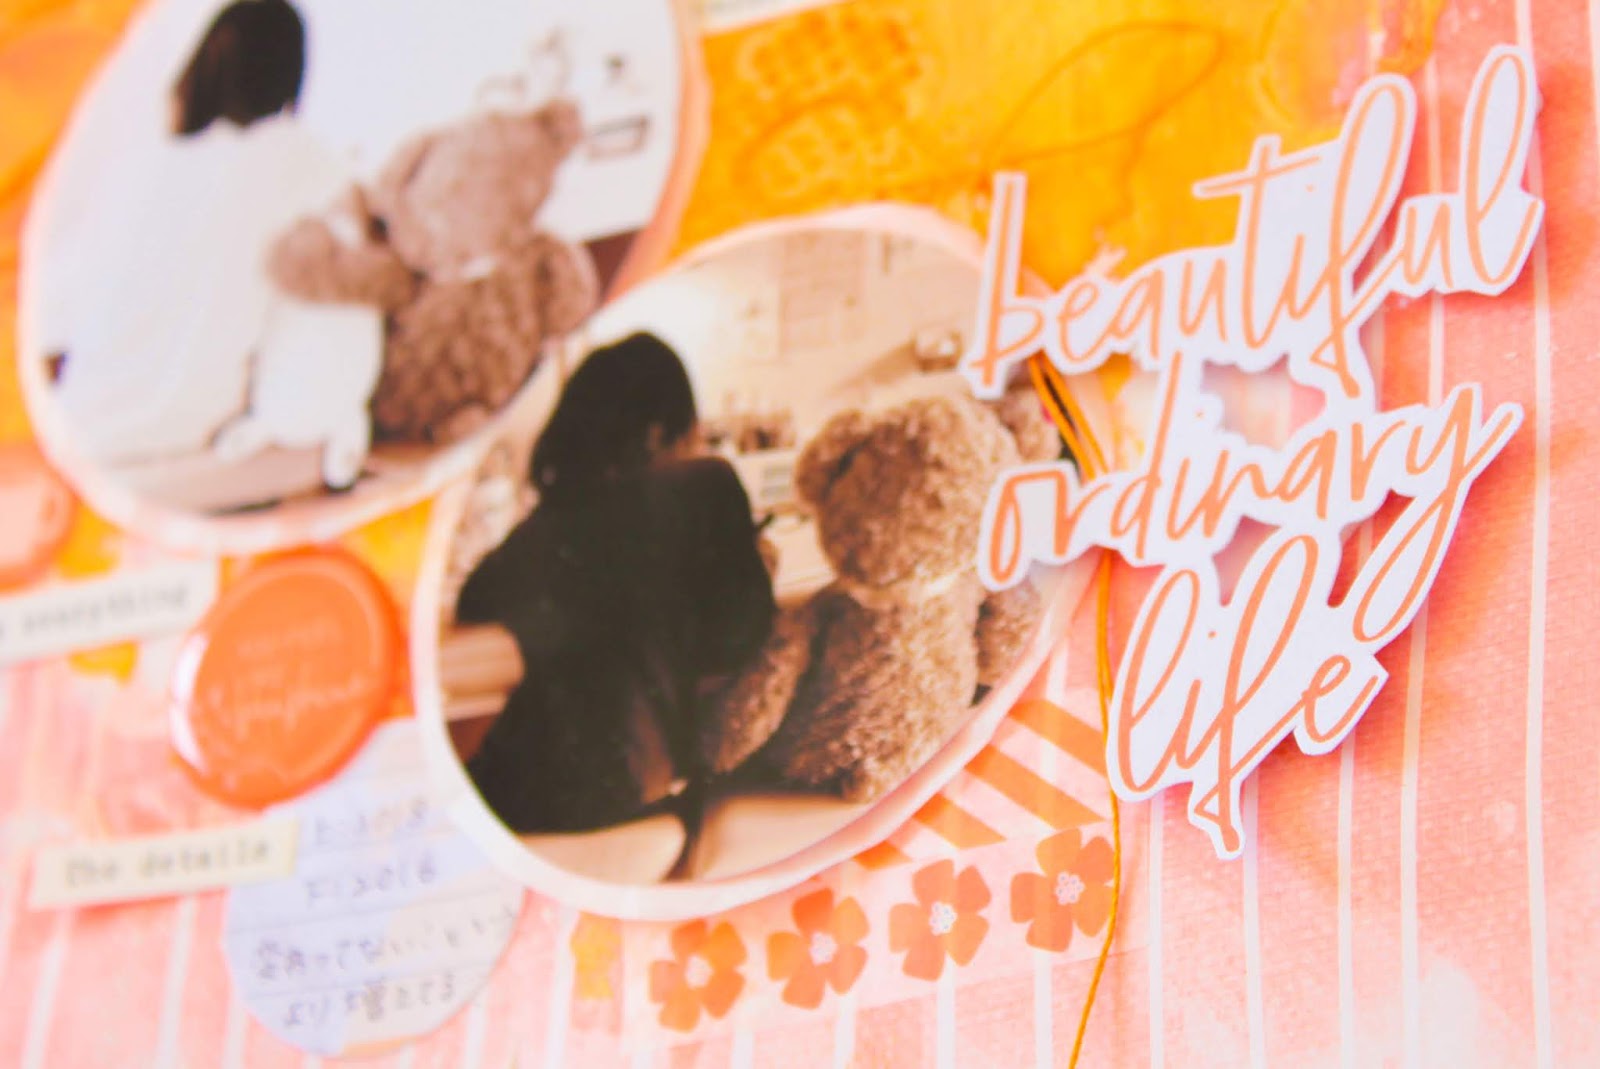
First, I spread clear gesso on the background because I wanted to do some mixed media. I was inspired by the colors of the paper, so I painted the background with matching colors. I layered the photo with paper and cloth, popped it up with foam and adhered it to the background. I embellished the left side of the photo with die cut leaves and words. On the right side, I made a shaker box with a wooden ring and put sequins inside. Also, I created a banner with wooden pieces. Here are the close -ups;

まず、絵の具をたくさん使いたかったので、背景にクリアジェッソを塗りました。ペーパーの色に合わせて絵の具を塗って乾かし、写真にペーパーと布を重ね、フォームでポップアップ。写真の左側にはダイカットの葉っぱと英字で飾り、右側には木のリングで作ったシェーカーボックスを飾りました。中にはスパンコールを入れています。さらに、木のパーツでバナーを作りました。


I love the soft colors! Thank you so much for stopping by, and have a nice weekend!

柔らかい色合いが気に入っています♪ 訪問して下さり、ありがとうございました。良い週末をお過ごしくださいね!

Instagram URL http://instagram.com/natsukoslittlecraftroom

Natsuko xxx


2018年11月15日木曜日

DO YOUR THING (CSI CASE FILE #266 DT Work)

 
Hi! The new mid-month Challenge from CSI has been revealed, and this is my take! Here is the Case File.
 
こんにちは!CSI 今月2つ目のチャレンジが発表されました!こちらがチャレンジ♪


I took inspiration from the colors and the boxes. I started with cutting cardstock into rectangles and coloring them with crayons. Before I adhered them, I sprayed and painted with ink on the background. Then I sewed one side of each rectangle with matching thread. I layered the photo with tissue paper and diecuts, and popped it up with foam to create dimention. I embellished with puffy stickers, wooden pieces, acetate diecuts, ribbons and metal pieces. To add a little more interest, I used modeling paste and created patterns on some parts of the layout. I love how bright and colorful it had turned out. Here are the details;

写真の色と四角が印象的だったので、まずペーパーを四角にカットし、クレヨンで着色。貼りつける前に背景をインクで着色しました。四角を並べ、それぞれの一辺を同じ色の糸を使ってミシンで縫いつけました。写真に包装紙とペーパを重ね、フォームを貼って立体感を出しています。エンベリに、ぷっくりステッカー、木のパーツ、アセテートのダイカット、リボン、メタルパーツなどを使いました。さらに、モデぺを使って数か所に模様をつけました。明るくカラフルなレイアウトに仕上がりました!


Thank you so much for stopping by, and have a nice day!

訪問して下さり、ありがとうございました。良い一日を♪

Instagram URL http://instagram.com/natsukoslittlecraftroom

Natsuko xxx


2018年11月3日土曜日

love you (Scrap Our Stash DT Work)


 Happy Saturday!! Today's layout is based on the new Challenge from Scrap Our Stash. I love using stars in my layout, so this challenge was so exciting! I decided to use tons of stars!!
 
こんにちは!今日は、Scrap Our Stash のDTワークです。星をレイアウトに入れるのは大好きなので、とても楽しかったです!とにかく☆をたくさん使いました!
 

I spread clear gesso on white cardstock and painted over it with 3 watercolors on the background. Then I used my die cut machine and cut out many stars with the same colors. I cut out 2 frames and layered them underneath the pictures. I scattered the die cut stars on the painted background and added some white foam stars and the title. I also added some star sequins. So! That's about it! Simple but colorful! I thought of adding something different, but that would be too much. Here are the close-ups;

白のカードストックにクリアジェッソを塗り、その上に三色の水彩絵の具を塗りました。次にダイカットマシンで絵の具と同じ色の星をたくさんカットアウト。ペーパーからフレームを二つ切り、写真と重ねました。星を同色の背景に散りばめて、白の星とタイトルを追加。さらに星形のスパンコールもつけて完成!超シンプルだけどカラフル!他のエンベリを足そうと思いましたが、ごちゃごちゃになるのでこれでOK!


Thank you so much for stopping by, and have a great weekend!

訪問して下さり、ありがとうございました。良い週末をお過ごしくださいね♪

Instagram URL http://instagram.com/natsukoslittlecraftroom

Natsuko xxx

2018年11月1日木曜日

hello beautiful (CSI CASE FILE #265 DT Work)


Hello again!  This layout is based on the Challenge from CSI ! This is the new casefile. Please visit the website for further details!
 
またまたこんにちは!このレイアウトはCSI の新しいチャレンジで作りました。詳細は、チャレンジサイトを見てね♪
 
From the evidence, I chose Stripes, Frames, Flower and Something Shiny. This is my daughter, half asleep, tired from playing around in pre-school. She wanted to finish the jig-saw puzzle, but she fell asleep on it.

I used a cream colored background and stenciled some flowers with shiny paint. I ended up covering most of it, but still, I like the way it shows around the picture. I colored some flower stickers and decorated them with some fussy cut flowers around the photo. I also cut out a frame, butterflies and other pieces from paper, and created some clutters. I finished the layout by splattering some paint and little pearl stickers. Here are some close-ups;

条件リストから私が選んだのは、ストライプ、フレーム、お花、何か光るもの、です。娘が幼稚園から帰ってきて疲れて寝そうな写真です。ジグソーパズルの続きをしたいのに、この後寝ちゃいます(笑)

クリーム色の背景に光る絵の具でお花をステンシル。結局ほとんど見えなくなりますが、写真の周りに少し見える感じがいい!お花のステッカーに色を塗り、カットアウトしたお花と写真の周りに飾りつけました。フレーム、蝶などペーパーからカットアウトし、エンベリの塊を作りました。最後に絵の具を飛ばし、小さいパールステッカーを散りばめて完成!


Thank you so much for stopping by, and I hope you play along!

訪問して下さり、ありがとうございました。皆さんも是非、参加して下さいね♪

Instagram URL http://instagram.com/natsukoslittlecraftroom

Natsuko xxx

darling (Let's Get Sketchy DT Work)


Hi!! Today I'm happy to share my new layout for Let's Get Sketchy. Here is the sketch:)
 
こんにちは!今日は、Let's Get Sketchy のスケッチで作った新しいレイアウトを紹介します。こちらがスケッチ♪


I started with a dark background. To soften it a bit, I spread white gesso. I decided to fussy cut flowers from a gorgeous paper from pink fresh studio. I love the soft colors! I pulled out my mixed media collection and found a coral textured paste that matches perfectly with the flowers. I created patterns with it with a stencil, and let it dry. Then I thought I needed some mustard yellow color for accent so I splattered some paint. I decorated the cut out flowers around the pictures. some of them under the photo, some of them over. And some more on the top and bottom of the layout. I used a die cut for the title. Here are the details;
 
まず、暗めの色の背景を用意して、白のジェッソで色を和らげました。次に、pink fresh studio の花柄ペーパーをカットアウト。色が柔らかくて素敵!背景に戻り、ちょうどお花の色に合うテクスチャ ペーストを見つけたので、それを使ってステンシルで模様づけ。さらに、マスタード色の絵の具を飛ばしてアクセントに。写真の下や上に重なるようにお花を配置して貼りつけました。レイアウトの上下にもお花を足しました。最後にタイトルにしたダイカットをポップアップして完成!


Thank you so much for stopping by!

訪問して下さり、ありがとうございました♪

Instagram URL http://instagram.com/natsukoslittlecraftroom

Natsuko xxx


beautiful ordinary life (White...with 1 DT Work)

 
Hi Scrappers! This month's plus one color from the White...with 1 Challenge is Orange Blaze! There is also a mood board for inspiration.

スクラッパーの皆さん、こんにちは!White...with 1 今月のカラーはオレンジ・ブレイズ!ムードボードもありますよ♪


I was inspired by the different textures of the mood board and the typewriter. I started with spreading white gesso on the background. Then I pulled out several stencils and modeling paste to create various patterns with different texture. After it had dried, I covered the patterns with orange watercolor and sprayed some water over it to drip. I love how the patterns show. I cut the pictures in circles and layered vellum underneath. These pictures are my daughter, studying (or drawing) at her desk with her loving teddy bear beside her. They were taken at a different year, but nothing has changed...oh, there's an extra bear between them in the recent picture lol. To add extra interest, I tied  orange thread and adhered them around the photo. I also used some puffy stickers and typed word stickers and popped up the title for dimention. Here are the close-ups;

ムードボードの色んな質感とタイプライターからインスピレーションをもらいました。まず背景に白のジェッソを塗り、ステンシルとモデぺを数種類使って色んな模様を色んな質感で作りました。乾いた後、オレンジの水彩絵の具を塗り、水をスプレーして滴るようにしました。模様が浮き出るのがいい感じ!写真を丸くカットして、ヴェラムを重ねました。写真は、娘が机に向かって勉強(お絵かき?)しているところです。違う年に撮ったものなのに、どちらも大好きなくまちゃんが横に(笑) まったく変わらないと思ったら一匹増えてる…(笑) さらにオレンジの糸を結んで写真の周りに貼りつけ、ぷっくりステッカーやタイプフォントの英字を加え、タイトルをポップアップして立体感をプラスしました。


Thank you so much for stopping by, and I hope you will join us!

訪問して下さり、ありがとうございました。皆さんも是非、参加して下さいね♪

Instagram URL http://instagram.com/natsukoslittlecraftroom

Natsuko xxx