2018年12月17日月曜日

WONDERFUL Adventures (Scrap Our Stash DT Work)


Hello again!  Here is my layout for the Scrap Our Stash Blend A Sketch Challenge. Here are the sketches, and you must use 3 or more of the same kind of embellishments.
 
またまたこんにちは!今日のレイアウトは、Scrap Our Stash のスケッチチャレンジで作ったDTワークです。二つのスケッチを組み合わせて一つのレイアウトにすること、それから同じ種類のエンベリを3つ以上使うこと。こちらがスケッチです♪
 

I used the upper half of the right sketch and the lower half on the left sketch. I started with cutting a big piece of paper with flowers on it. After I adhered it, I cut out tiny flowers and butterflies and scattered them around the big piece.  Then I machine stitched the traces of the butterflies. I printed the pictures small and cut them in squares, layered several paper and embellished around them with cute diecuts and stickers. I used 3 wooden flairs and 3 puffy stickers.  On the lower right corner, I created a cluster of flowers and stickers. At the very end, I sprayed some ink that matches the flowers. This is rare because I usually use ink before I adhere anything but I think it has turned out nice and colorful. Here are the details;

右のスケッチの上半分と、左のスケッチの下半分を使いました。まずはお花のパターンペーパーをカットアウトしました。貼りつけた後、小さい花と蝶をカットアウトし、周りに散らしました。さらに、蝶の飛び回る様子を表すため、ミシンをかけました。写真は小さめにプリントし、四角にカット。ペーパーを重ねて周りをダイカットやステッカーで飾りつけ。3つ以上のものは、木のボタンとぷっくりステッカーです。左下にもお花とステッカーを貼りつけました。最後に、お花に合う色で着色、スプレーしました。いつもは着色は最初にするのですが、今回は最後に。カラフルで楽しいレイアウトに仕上がりました。


Thank you so much for stopping by, and have a nice day!

訪問して下さり、ありがとうございました。素敵な一日を♡

Instagram URL http://instagram.com/natsukoslittlecraftroom

Natsuko xxx


2018年12月15日土曜日

Sounds of the Season (CSI CASE FILE #268 DT Work)


Hello friends! Today I'm happy to share my new Christmas layout for CSI. Hereis the challenge;


This picture is my daughter and the old Christmas tree that I used to have since I was a child. Of course many branches had already fallen off  because it's so old but I couldn't throw it away for a long time. I was happy that I was able to keep it until my daughter was old enough to decorate it. This is the last year that we decorated this tree, and this picture is full of memories.

これは、娘と、私が子供のころから飾っていたクリスマスツリーの写真です。長い年月が経っているので枝もたくさん取れてしまっていましたが、なかなか捨てられませんでした。今はもう処分してしまいましたが、娘が自分で飾りつけが出来るようになるまで成長し、その様子を写真に収められたのでとても思い出深い写真です。

I used a wood paper for the background. I didn't used any mixed media on this layout, but did a lot of fussy cutting. I cut out circles, snowflakes, leaves and little christmas elements and created a wreath. I also added red sequins, wooden elements and a ribbon. Around and under the photo, I layered chipboard stickers. I punched out tiny circles and sprinkled them around the picture and finished the layout. Here are the close-ups;

木目ペーパーを背景に使いました。今回は着色はしませんでしたが、たくさんカットアウトしました。丸や雪の結晶、葉っぱ、クリスマスに関係のあるものを切り抜き、リースにしました。赤のスパンコールや木のエンベリ、リボンも加えました。写真の下や周りには、チップボードステッカーを重ねて貼り、周りにパンチした小さな丸を散りばめて完成!


I love how this turned out! Thank you so much for stopping by!!

訪問して下さり、ありがとうございました。

Instagram URL http://instagram.com/natsukoslittlecraftroom

Natsuko xxx


2018年12月3日月曜日

TWINKLE Bright (Scrap Our Stash DT Work)


 Hi! Today I'm excited to share my new layout for Scrap Our Stash . Create a winter layout and use snowflakes embellishments on your layout!

こんにちは!今日は、Scrap Our Stash の新しいチャレンジで作ったレイアウトを紹介します♪ 冬のレイアウトを作ること、そして雪の結晶を入れること!
 

I cut out colorful houses and adhered them randomly on the bottom half of the layout. Then I put snow tex on the roofs and the ground. I heat embossed snowflakes on the upper half of the layout, and painted over them with similar colors as the houses. I added snowflake brads and acryl pieces, pearls and rhinestones. I used a diecut as the title and popped it up. It seldom snows where I live, but I love this wintery layout:)

まず、レイアウトの下半分にカットアウトしたカラフルなお家を並べ、屋根と地面ににスノーテックスをのせました。次に、レイアウトの上半分に雪の結晶をヒートエンボスして家と同じような色で上から着色しました。雪の結晶のブラッズとアクリルピースを加え、パールとラインストーンで飾りつけました。タイトルにはダイカットを使い、ポップアップ。私の住んでいる場所は滅多に雪は降りませんが、冬の雰囲気のレイアウト、なかなかのお気に入りになりました♪


Hope you will join us, and thank you so much for stopping by!!

皆さんも是非作ってみて下さいね!訪問して下さり、ありがとうございました。

Instagram URL http://instagram.com/natsukoslittlecraftroom

Natsuko xxx


2018年12月1日土曜日

MeRRy CHRISTMaS (Let's Get Sketchy DT Work)

 
Hello again! I'm happy to share my new layout created with the new sketch from Let's Get Sketchy!  Here is the sweet sketch:)

またまたこんにちは!Let's Get Sketchy の新しいスケッチで作ったレイアウトを紹介します。こちらがスケッチ♪

 
I cut pink check patterned paper, layered a lace ribbon on the upper paper and a punched out border on the bottom paper. I machined stitched the edges of the paper with red thread. I stencilled the snowflakes with gold textured paste, and splattered some gold ink. I matted the photo with chipboard, decorated around it with Christmas elements. I also used wome dew drops, rhinestones and brads. Here are the details;

ピンクチェックのパターンペーパーをカットし、上のペーパーにはレースのリボンを、下のペーパーにはパンチしたボーダーを重ねてミシンをかけました。ステンシルとゴールドのモデぺで雪の結晶を模様づけ、さらにゴールドのインクを散らしました。写真はチップボードを重ね、周りをクリスマスのエンベリで飾りつけ。デュードロップ、ラインストーン、ブラッズも使って華やかに。


Thank you so much for stopping by!!

訪問して下さり、ありがとうございました。

Instagram URL http://instagram.com/natsukoslittlecraftroom

Natsuko xxx


Together with YOU (CSI CASE FILE #267 DT Work)


Happy December!  CSI  has come up with a new Christmas Case File for this month! Here is the Caes File;
 
こんにちは!あっという間に12月ですね。焦るーー!CSI の新しいチャレンジは、クリスマスのアドベントカレンダーをイメージ♪
 

I chose Grid pattern, Christmas/holiday elements, Numbers and Animals from the Evidence. Advent Calenders remind me of my own childhood (I used to love it), so I felt so happy making this layout.

私はグリッド・パターン、クリスマス、数字、動物を選びました。子供の頃、アドベントカレンダーが大好きだったので、楽しい気持ちで作れました。

I started with cutting squares and lining them up leaving the center open. After I adhered them, I used some mists and paint and splattered over the squares. I placed my photo in the center, and decorated the squares with glittery numbers, diecuts and puffy stickers. I also replaced some of the squares with diecuts. I drew some lines on the corners with a gold pen, and finished the layout! Here are the details;

まず、四角をたくさんカットし、真ん中は空けたまま並べました。貼りつけた後、ミストや絵の具を使って四角の上を着色しました。真ん中に写真を貼りつけ、四角をキラキラした数字、ダイカット、ステッカーなどを使って飾りつけ。いくつかの四角は、ダイカットに変えました。4隅にゴールドのペンで線を描いて完成!


Hope you enjoy creating too, and thank you so much for stopping by.

皆さんも楽しんで作ってくださいね♪ 訪問して下さり、ありがとうございました。

Instagram URL http://instagram.com/natsukoslittlecraftroom

Natsuko xxx


me + you (White...with 1 DT Work)

 
Hi Friends! The new Challenge from White...with 1 has been revealed and this is my take! The color this month is Vivid Gold and there is a sketch to go with it!   
 
こんにちは!White...with 1 の新しいチャレンジが発表されました。今月の色はビビッド・ゴールドです。スケッチもあるので合わせてどうぞ!


I started with using two of my star stencils and created patterns with modeling paste. After it had dried, I sprayed some gold ink. On the top and bottom of the layout, I adhered white lace and gold washi tape. I matted the pictures with white cloth and embellished around them with chipboard, lace paper, diecuts, stickers and a clip. I added some more golden stars and finished the layout. Here are the details;

まず、星のステンシルを2種類とモデぺを使って模様をつけました。乾いた後、ゴールドのインクで着色しました。レイアウトの上下に白のレースとゴールドのマステを貼りつけました。写真は薄い布を重ね、周りをチップボード、レースペーパー、ダイカット、ステッカー、クリップで飾りつけました。ゴールドの星をつけ足して完成!


Thank you so much for stopping by, and I hope you enjoy creating too!

訪問して下さり、ありがとうございました。 皆さんも楽しんで作ってみて下さいね♪

Instagram URL http://instagram.com/natsukoslittlecraftroom

Natsuko xxx

2018年11月17日土曜日

PARADISE (Scrap Our Stash DT Work)


Hello!!  Here is my take on the Blend A Sketch Challenge from Scrap Our Stash. Here are the sketches, and don't forget to add Pennants or Banners!
 
こんにちは!Scrap Our Stash の新しいチャレンジで作ったDTワークを紹介します。こちらがスケッチです。ペナントまたはバナーを加えるのもお忘れなく!
 

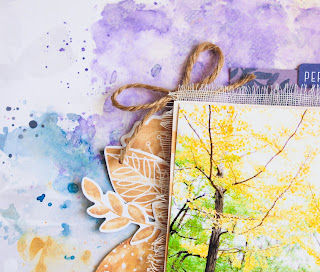
First, I spread clear gesso on the background because I wanted to do some mixed media. I was inspired by the colors of the paper, so I painted the background with matching colors. I layered the photo with paper and cloth, popped it up with foam and adhered it to the background. I embellished the left side of the photo with die cut leaves and words. On the right side, I made a shaker box with a wooden ring and put sequins inside. Also, I created a banner with wooden pieces. Here are the close -ups;

まず、絵の具をたくさん使いたかったので、背景にクリアジェッソを塗りました。ペーパーの色に合わせて絵の具を塗って乾かし、写真にペーパーと布を重ね、フォームでポップアップ。写真の左側にはダイカットの葉っぱと英字で飾り、右側には木のリングで作ったシェーカーボックスを飾りました。中にはスパンコールを入れています。さらに、木のパーツでバナーを作りました。


I love the soft colors! Thank you so much for stopping by, and have a nice weekend!

柔らかい色合いが気に入っています♪ 訪問して下さり、ありがとうございました。良い週末をお過ごしくださいね!

Instagram URL http://instagram.com/natsukoslittlecraftroom

Natsuko xxx