2017年11月20日月曜日

XOXO

 
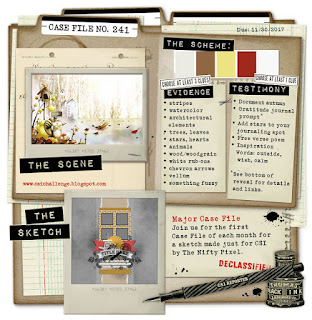
Happy Monday! Today I made a layout with the Challenge from CSI! I chose to try out their new twist on the case file. I drew inspiration from THE SCENE. (the colors and leaves). Here is the new twist;

こんにちは!今日は、CSI のチャレンジでレイアウトを作りました。今回は2種類のチャレンジから選べたので、私は制限の少ないこちらのチャレンジで作りました。この写真から得たインスピレーションでレイアウトを作ります(私は色と葉っぱ)。

And here is the traditional case file!
 
そしてこちらがいつものチャレンジ(色やスケッチ、リストの中の条件を元に作ります)。

I was inspired by the colors and leaves, so I decided to die cut a bunch of leaves in autumn colors. I mixed glue and glitter and dipped some of the leaves in it for sparkles. After it had dried, I crumpled the leaves to add interest. Before I placed all the leaves in the layout, I used watercolors to color the center of the background paper. I also painted wooden pieces with them to make unity. I matted the photo and journal envelope with brown paper, and put foam underneath them to add dimention. I tied a ribbon on a tag and slipped it into the envelope. After I placed all the leaves and wooden pieces, photo and journal tag, I entwined some strings around the leaves. I also put some colk stickers and wooden flairs for embellishments. Here are some close-ups;

写真にある色や葉っぱを使いたかったので、秋色のペーパーでたくさんの葉っぱをダイで抜きました。透明の糊とグリッターを混ぜて、いくつかの葉っぱの先につけてキラキラに。乾いた後、葉っぱを少し折り曲げて立体感を出しました。葉っぱを貼りつける前に、背景を水彩絵の具で着色しました。木のタイトルとエンベリも同じ色を使って着色し、統一感を。写真とジャーナル用の封筒は茶色のペーパーでマットし、フォームをつけてポップアップしています。タグにはリボンを結び、封筒に入れました。葉っぱと木のパーツ、写真、ジャーナルを貼りつけた後、葉っぱの周りに紐を絡めました。後は、コルクのステッカーや木のボタンなどで飾りつけて完成!


I really had fun with this challenge, and I love how the leaves look! Thank you so much for stopping by and I hope you have a nice week!
 
今回のチャレンジも楽しかったです!色んな形や大きさの葉っぱがお気に入り♪ 訪問して下さり、ありがとうございました。皆さんもトライしてみてね!
 
Instagram URL http://instagram.com/natsukoslittlecraftroom

Natsuko xxx


2017年11月17日金曜日

so sweet (Scrap Our Stash DT Work)


Hi friends! The brand-new Sketch Challenge from Scrap Our Stash has been revealed!
Rule: Create a layout inspired by this sketch and add a stash item from your stash that starts with each letter of the word THANKS.
I chose T-Tassels, H-Hearts, A-Arrow, N-Notebook Punch, K-Key, S-String.

皆さんこんにちは!Scrap Our Stash の新しいスケッチチャレンジが発表されました!
ルール:スケッチ+THANKS の頭文字で始まるアイテムを使ってレイアウトを作ること。
私は、タッセル、ハート、矢、ノートパンチ、鍵、紐を使いました。こちらがスケッチです♪
 
 
This is a picture of my daughter when she made a cake for her dad's birthday. We made the sponge cake together, and she decorated by drawing his face! I'm not sure if it looks like him, but she seemed really satisfied how it turned out!!
 
娘がお父さんのためにケーキを作った時の写真です♪ 土台のスポンジは私と一緒に作りましたが、似顔絵は娘作!似てるかどうかは置いといて(笑)…娘は仕上がりに大満足!

I wanted to create a festive mood, so I made a banner with some colorful TASSELS, KEY and STRING. Before I attached it to the layout, I smudged some yellow and pink paint on the background.

お祝いの楽しい雰囲気を出したかったので、タッセルと鍵と紐を使ってバナーを作りました。レイアウトに貼りつける前に、背景に黄色とピンクの絵の具で着色しました。


Then I tore some paper and punched them. One with a NOTEBOOK PUNCH, and another with a curly punch. I layered them like the sketch. I framed the photo with a diecut, and decorated around with the tassel banner, HEART and ARROW stickers and diecuts. I splattered some black acrylic paint to spice up the layout and I love how it turned out!

ペーパーを何種類か破って片側をパンチし、スケッチのように重ねて配置しました。写真は、ダイカットのフレームを重ね、周りをタッセルバナーと、ハートや矢印のステッカーやダイカットで飾りました。最後に、黒いアクリル絵の具を飛ばして完成!


I hope you will enjoy this challenge and I can't wait to see what you'll come up with! Thank you so much for visiting and have a great day!

皆さんのレイアウトを楽しみにしています。訪問して下さり、ありがとうございました。

Instagram URL http://instagram.com/natsukoslittlecraftroom

Natsuko xxx


2017年11月15日水曜日

fun moments (Colorful Creations DT Work)


Today I'm sharing my last DT work for the final Challenge from Colorful Creations since it is going to have a break. I really enjoyed all the challenges here and being on this awesome team, and I hope the site will reopen someday:)
 
This is the challenge. Using this photo as inspiration create a layout or project using what caught your eye.  It can be anything from the colors, to the items, background, textures you name it. Tell us what caught your eye and was the inspiration of your creations.

今日のレイアウトは、Colorful Creations の最後のチャレンジで作った作品です。最後というのは、サイトがしばらくの間活動を休止するからです。ここのチャレンジは本当に多種多様で楽しく、デザインチームも素敵な方ばかりだったので残念ですが、また再開する日を楽しみにしています。
 
こちらがチャレンジです!写真を見て作品を作ってください。色でもアイテムでも、背景、テクスチャ、何でも大丈夫です!自由に考えて、楽しんでくださいね!


I was inspired by the colors and the shimmers on the leaves. I used a brown cardstock for the background, and spread some gold textured paint. I used a stencil and extended the gold by scattering some stars. To add more, I took out my die cut machine and cut out several stars in different sizes. I also die cut some frame shapes and layered them underneath the pictures. The pictures are all matted with teal patterned paper. I placed all the stars, some under the pictures and some over them. I added some more star with stickers. The other embellishments are enamel dots, chipboard pieces and a wooden flair. For the title, I used gold and teal sticker words. They are awesome! Here are some close-ups;

写真の色と葉っぱのキラキラからインスピレーションをもらいました。茶色のバジルペーパーを背景にして、ゴールドのテクスチャペイントを広げました。さらに同じペイントで、ステンシルを使って星をたくさんのせました。次に、ダイカットマシンで色々な大きさの星をカットしました。フレームもカットし、写真の下に重ねました。写真はそれぞれ、パターンペーパーでマットしています。星は、写真の下や上に配置して、ステッカーの星も追加!他に、エナメルドッツ、チップボード、木のボタンで飾り付け、英字のステッカーをタイトルにして完成!


I don't usually use more than 2 photos, and I usually use patterned paper or white cardstock for the background, but I do LOVE how this turned out! I'm so thankful to the various challenges because they tell me how to think out of the box of try something new. It would be great it you can find a little something from here too♡ Thank you so much for stopping by!

普段は、2枚以上写真を使うことはほとんどないのと、台紙も白かパターンペーパーしか使わないのですが、このレイアウト、すごく気に入っています!色んなチャレンジで作品を作ることで、普段しないことをしたり、新しいことにチャレンジ出来るので感謝です!私も、皆さんがここでほんの少しでも何かアイデアのヒントを得てくれたらいいなと思っています♪ 訪問して下さり、ありがとうございました!

Instagram URL http://instagram.com/natsukoslittlecraftroom

Natsuko xxx


2017年11月13日月曜日

LIFE is an AWESOME ADVENTURE

 
Hi Scrappy friends! Today I made a layout with the challenge from 123 Challenge Blog ! Here is the challenge!

スクラッパーの皆さんこんにちは!今日は、123 Challenge Blog のチャレンジでレイアウトを作ってみました♪

This is a picture of my daughter when she was is pre-school, waiting for the school bus to come. The color of her uniform was a perfect match for the challenge. First of all, I made a frame by ripping a patterned paper. I pulled out some silver textured paste and a stencil to create dimentional patterns around the photo. After it had dried, I smudged some yellow green ink with a paint brush and also splattered some around. I layered some paper and a ribbon under the photo, and put some foam underneath. I made circles with green twine, and place the photo in the middle of the big circle. The banner is made with twine and fussy cut triangles. I popped up those too along with the camera and bag diecuts. I also used some chipboard pieces, an acrylic tag, and metallic flairs. I used the required word as my title, with alpha stickers. Here are some close-ups;

制服の色がチャレンジにピッタリだったので、幼稚園バスを待っている娘の写真を使いました。まず、パターンペーパーを破ってフレームに。次に、写真の周りに来るように、シルバーのテクスチャペイントとステンシルで模様をつけ、乾いた後に黄緑のインクを塗って、周りにも飛ばしました。写真の下にはペーパーとリボンを重ね、フォームでポップアップして立体感を出しています。緑のトワインで輪を2つ作り、写真を大きいほうの輪の中心に配置しました。バナーは、トワインと切り抜いた三角で作りました。これらの三角と、カメラとバッグのダイカットもポップアップしました。他にも、チップボード、アクリルタグ、メタルパーツを使って飾り付け。チャレンジの言葉をアルファベットステッカーでタイトルにして完成!


I had a lot of fun making this layout with boyish colors! Thank you so much for stopping by, and I hope everyone has a happy scrappy time!

ボーイッシュカラーで作るの、楽しかったです!訪問して下さり、ありがとうございました。皆さんもスクラップブッキング、楽しんでくださいね♪

Instagram URL http://instagram.com/natsukoslittlecraftroom

Natsuko xxx


2017年11月9日木曜日

Love LOVE love

 
Today's layout is based on the challenge from WHITE...with 1. Yellow is one of my favorite colors, so I really enjoyed creating this layout! This is the moodboard.

今日のレイアウトは、 WHITE...with 1 のチャレンジで作りました♪ 黄色は、好きな色の一つなので、楽しく作れました。こちらがイメージです。


I spread some gesso on the background before I started to use any ink, and after it had dried, I used a template and yellow texture paint to create the patterns. I drew a guideline before I did this, to make sure the patterns will show from behind the picture. I splattered some dark and light yellow ink to add a little more interest. I made a loop with yellow twine, decorated part of it with flowers and leaves and made it like a wreath. I layered yellow tissue paper behind the picture, and slipped it into the wreath so it will be like a frame. On the botton right corner, I layered some ribbons and washi tape. I used a chipboard sticker for the title, and another for an embellishment. Here are some close-ups;

インクを使う前に、まずジェッソを背景に塗り、乾いた後、テンプレートと黄色のテクスチャーペイントを使って模様をつけました。予め、写真を貼るところにしるしをつけておけば、バランスよく模様や着色ができます。もう少し変化をつけるために、2種類の黄色のインクで着色しました。次に、黄色の紐を2重から3重の輪にして、部分部分にお花や葉っぱをくくりつけてリースのようにしました。写真には黄色のお花紙を重ね、リースの間に配置してフレームのようにアレンジ。右下には、リボンやマステを重ねて並べました。タイトルとエンベリには、チップボードのステッカーを使って完成♪


I didn't put too much embellishments on this layout, but I love how this turned out! Thank you so much for stopping by. Have a wonderful day!

今回はシンプルに、エンベリもあまり使いませんでしたが、お気に入りのレイアウトになりました。
訪問して下さり、ありがとうございました!

Instagram URL http://instagram.com/natsukoslittlecraftroom

Natsuko xxx


2017年11月8日水曜日

lovely smile


Hello scrappers! Today I made a layout based on the KRAFT PLUS CHALLENGE! Here is the challenge;
 
こんにちは!今日は、KRAFT PLUS CHALLENGE でレイアウトを作ってみました。こちらがチャレンジです。何か大きいもの+クラフト紙を使ってレイアウトを作ること。


Criteria : Kraft + something BIG

 
I chose a BIG PHOTO of my daughter. Look at her happy face! I wanted to make a colorful layout to match her happy face, so I started with spreading some gesso to lighten up the background. Next, I used a floral template and some textured paste (blue and silver) and let it dry. Then I sprayed some blue, yellow and pink ink over the patterns to add a little more color. I framed the picture with several torn washi tape. To add some sparkles, I scattered sequins and rhinstones. I also added some wooden pieces,  puffy stickers and a metal brad. I finished the layout with silver word and heart stickers for the title. Here are some close-ups;
 
娘の大きな写真を使うことにしました。幸せそうな顔でゼリーを食べる娘(笑)。 ハッピーな雰囲気に合わせて、カラフルなレイアウトにしたかったので、まずは背景を明るくするためのジェッソを塗りました。その後に、ステンシルとペースト2種類(ブルーとシルバー)使って花模様をつけ、乾いてから、ブルー、イエロー、ピンクのインクをスプレーしてさらにカラフルに。写真の周りには、マステを数種類ちぎってフレームのように配置しました。スパンコールやラインストーンでキラキラをプラスして、木のエンベリやぷっくりステッカー、メタルブラッズで飾りました。最後に、シルバーの英字とハートでタイトルをつけて完成!


This is a great challenge, and I had so much fun creating this layout♪
Thank you so much for visiting, and have a great day!
 
とっても楽しく作ることができました!皆さんも是非トライしてみて下さいね♪
訪問して下さりありがとうございます♡

Instagram URL http://instagram.com/natsukoslittlecraftroom

Natsuko xxx